Sunday, April 28

Perennials vs Annuals: What's the best answer?

It seems like we are going to get rain for the next few days, so I'll have to enjoy my garden from afar, or at least just a little bit damp.  But it will give me a little more time to talk flowers, gardening, planting and such: My favorite topics ever!

So: do you get overwhelmed at the garden center?  I visited one this week that had me so overwhelmed and excited I was stopped in my tracks!  There were so many beautiful plants, flowers, shrubs and everything else you could possibly need for your garden, indoors or out.  It was amazing!  (If you're curious, it was Strange's Florist in Richmond and I cannot WAIT to go back!)

There are many things to consider when planning your garden.  One is whether to plant perennials or annuals, or a combination of the two. 

Here are a few things to consider based on my experiences for the last 4 decades.  There are exceptions to everything, and plants are no different; here are a few of the basics:

  • Price.  Perennials cost more than annuals.  From seed to a plant that is ready to flower and flourish in a garden can take 2 seasons or more, so the grower has a lot more invested in that older plant.  Annuals are seeded, flower and bloom the first season, and therefore are less expensive.  (Exception: there are a few perennials that will bloom the first season!) 

  • Life expectancy:  Annuals will bloom and live for one season only; perennials will last for many years, so your investment pays off in the long run.  Again: there are exceptions!  Some annuals can reseed themselves (marigolds, and you can save the seeds), and some perennials only have a life of 2-3 years. 
  • black eyed susan
    rudbeckia
  •  Bloom time: Annuals tend to have a long season bloom life, and usually the whole season.  Perennials often bloom only once or twice and then are without blooms the rest of the season.  Exception examples: daylilies, coreopsis, rudbeckia (black eyed susans) are all good choices for long bloom times.
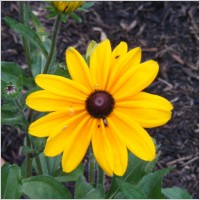
  • Space: This is a good or bad thing depending on what you want!  Annuals tend to be smaller and while they grow and get larger, then won't spread the way perennials do.  You get more color and more intensity, but in a smaller area (again, not a absolute for all plants!).  Perennials will grow and spread, especially over the years.  
So: What should you buy?  Depends!  Here are a few things to consider:

Do you have a small space to fill? Annuals. 
Are you going to be there for a short amount of time?  Annuals
Are you trying to build a garden for the long term? Perennials. 
Tight budget? Annuals
Want a messy, interesting garden with a lot of interest? Perennials.
Best ever? A mix of both! 

Because of the price issue with perennials, I have built my gardens over the years.  I start with a few perennials and fill in with annuals.  Each year I add to my perennials, and over time your garden will grow and fill in.  I always buy annuals for the long-term color, and the mix of the two is a perfect pair.  To get the full impact of annuals, plant in groups of at least three plants. 

Are you still not sure where to start?  My advice to to visit a well-respected garden center in your town.  They will only carry plants that are good for your planting zone, and you can see what is available and what they look like firsthand.  A lot of growers are now including scanable tags so the information you can get about the plant is right there on your phone!  Have friends or neighbors that have something blooming?  Talk to them, because a lot of perennials can be (and need to be) separated over time, and a lot of gardeners will have plants to share. 

Most important?  Just jump in and get started!  Plants can be moved, separated, trimmed and re-arranged.  Start small and simple, and grow over time.  Then, sit back, drink a cold glass of iced tea and enjoy your beautiful garden!


Thursday, April 25

Planting time: Perennials

I don't think there is anything prettier than springtime, and here in Virginia it's just an explosion of color this time of year. Charlottesville is no exception: everything just popped open overnight once the warmth hit and we are enjoying the most beautiful weather. I have the pleasure of a spring birthday, and I'm not sure if I loved springtime first, or if my love of it came out of the joy of the celebration.

As early as I can remember, my birthday gift was that of outdoor bedding plants. Even as a small child, I remember the dining room table spread with a cloth and filled with garden plants.  I had a dedicated space in the yard that was just for me, and it was dubbed the  "Laura's Memorial Garden". Memorial, not sure why, but I guess it was an odd hobby for a young girl! I had a bird bath, and hijacked some leftover bricks to build a path through the center. I spent many, many hours in my flower garden as a child.

I've continued the tradition. Living further west in the state and higher in elevation, my birthday is still the time where it is safe after last frost to seriously start planting.

  Every year I try to spend it at at least a few garden centers: today I hit two.

 Here is my bounty:

colors and textures...all without blooms!
 My goal with this trip included add color to my garden without the need for blooms.  Can you see all the color and texture?

  Besides blooms, leaf color and plants with differing textures in the leafy parts really can add interest to your garden all season.  It's easy to pick out what is blooming when you are buying, but you should keep in mind the look of your garden for the whole season, not just right now.  In the past, I have had gardens that were really pretty in the spring, but in the middle of July, everything was done and I was bored. 

I think the addition of some interesting leafy plants is just the thing to perk up my garden this year!  I'm busy getting them into the ground now, so I'll share more info on the particular plants soon!

Tuesday, April 23

My first Re-uphostery project: Done!

 
Yikes....here we go!  no turning back now.
From whence it came: This chair and ottoman were handed down to me from my grandfather's house; I have no idea how old they are, but I do know they are build solid.  The red vinyl?, plastic? covering wasn't wearing so well, and I decided it had to come off.

When I removed the red "covering", the underside was stamped "rubber"!  Well, that wasn't what I was expecting!


I saved each piece of rubber product.  As I took each piece off, I took pictures, and made really careful mental notes of the order of how pieces came over so I would know how to put them back on.  I learned a lot by doing that.


And here is the after:
 I wanted to have this beautiful "Bloom" motif in the center, with other planting words of wisdom around the fabric.
 
 
This is where I started after it was all stripped off.  I folded the first piece over the top, and folded in around the corners as I had seen on the old covering.   
 I started out using my new staple gun, but it wasn't working well in this hard wood.  So I switched to nails. 
 I tacked down the edges and added a brown piping to the edge to see how that would look.  In retrospect, I think I would have skipped the piping at this point for my first project; there are so many things going on in the learning stages of your first project, I think I should have kept it simple.

 But it's OK, and not something I will go back and tear out to fix.  I am a perfectionist, and would love certain areas to look better, but based on the time it would take, I'm not willing to change it all at this point.
  I found out that reupholstering is quite similar to sewing.  Put your seams right side together, and use tacks and tack strip as opposed to seams.   I lapped edges over when I needed to make a "seam", remembering that the finished edge should be on the bottom. 
 When it's folded back over, the nice folded edge is what is showing.
Upholstery tack strip i used to secure the fabric.  More important, it provides a crisp edge between the pieces above and below it. Once that is nailed together (and I used a lot more nails than I though I would, it makes for a nice tight "seam".  Once secure, fold down the next layer and repeat the process.


Here is my finished project, of which I am very proud!  I think my Pop-pop would approve of the result and of my can-try attitude.  And if you wonder why the ottoman is living on top of another ottoman right now?  Well, if you have cats, they love to check out a new piece of anything; until I get some sticky strips to protect the corners and deflect their curiosity, it will be in time out for a few more days.

So after doing the ottoman, would I attempt the chair? I'm not sure.
 I've learned a bit that I think will make a next project easier, but I'm not sure I'm ready for the next project to be as complicated as a  chair as opposed to another simple ottoman type project. 

These are two pieces that are built solid and I would love to use more.  They will definitely be more usable in a "non-rubber" type of covering. 


Friday, April 19

Replace your garbage disposal (You Can do This!)

Replacing your old garbage disposer might sounds really hard and complicated, but in reality, it's one of the easier projects I've undertaken.  Putting in a new one requires running an electric connection, which I would not attempt, but replacing it is really an easy, hour long project at most.

I really don't like working with electricity at all, and although I've replaced quite a few light fixtures and outlets, it's still not my favorite thing.  I make sure I follow very good safety rules, and check and double check before I do anything with wires.  Here are my steps:
  • Turn off the power at the outlet box.
  • Turn ON the switch that works the disposer; make sure it is off.
  • Turn the switch back off. 
  • To even be double safe, I tape over the switch in the off position. You never know when you might be called away and have to come back into a project, and in the meantime, you want to make sure nothing has changed. 
The only tools I used were a hammer (not completely necessary, but useful for small hands), a flat head screwdriver, and a large wrench.

There are three connections (two if you don't have a dishwasher), and you disconnect each:

Waste water connection from the dishwasher
Drain that takes water away from the sink
The connection to the flange at the sink

This last one is where I use my hammer: It's a slight turn to loosen it (and again to reattach), but it's tight: I tap it loose with the hammer to save my hands: I just don't have the strength, and this gets the job done.

Now on to the electrical:  Always pay attention before you disconnect your wires: How it comes off is how it goes back on.  As you see here, white is to white, black is to black, and copper goes to the green screw (the ground).   Twist the two wires together and screw on a wire nut to bind.


Now redo your three connections, and you have a new disposer!  The difficult part is managing the weight of the disposer and trying to twist it into place at the same time.  This was a little frustrating, and my shoulders were burning in the odd position under the cabinet.  Even with that challenge, I was able to get it installed in 13 minutes!  It really is that easy!

And don't forget: at this point, check for water leaks.  I keep a bucket under the disposer and turn the water on and let it run.  After a few minutes of being sure I see no leaks, I feel comfortable that all connections are good and tight.

I was able to do this by reading the instructions that came with it both times, but videos are also very helpful.  I love www.diynetwork.com for issues like this.....very helpful (and a great tip on how to avoid holding it up as you attach it....too late!)

So...this is a "You Can Do This" post from the mom with nails.  Total cost: $84 complete.


Birthday dinner with company


Here is one of my two dinner companions for my birthday dinner...how cute is she?  I love the Downtown Mall: you can have a nice meal, sit outside with humans and pets alike, and they even bring water dishes for the pups.  Of course she begged like mad for treats (can you see the paws moving wildly?)

It was a beautiful evening, and I wandered a little before she and I headed home.  

Enjoy our beautiful city---spring edition!


Tuesday, April 16

Happy, sad, and devastated

What a loaded day.  My beloved Carter turns 10 today.  We struggled to have him. We lost babies (in utero) both before and after him.  But he is here, with us, smiling and hugging and we will celebrate our precious gift today as a family.

A family in Boston is not hugging their precious 8 year old son this morning, and for them I am devastated.  My prayers are with his family and everyone else affected.

We also mourn with the Virginia Tech community and remember the victims of the horrific massacre there six years ago.


Monday, April 15

How to throw a stress-free kids birthday party

In ten years, we've had one birthday for the boy away from the house, and that was due to heavy rains.  Every other year that he's been old enough to have a "friend" party, he wants to stay home and just play. 

When he was younger, there was more planning and organizing and supervising.  This year was the easiest ever, by far.  Let me share our plans.

1) Invite a bunch of 9/10 year old boys to bring their nerf gun (or borrow one)

2) Sit on the porch sipping iced tea; feed and water as necessary.

Best....birthday.....party. Ever.

I overheard one boy say "This is the most fun party I've been to".  Awesome. That was the goal.

We added pizza breaks, water and gatorade, cake and ice cream as usual, but the bulk of the time was the joy in hearing 7 boys running around screaming, laughing, squealing and yelling.

Total success.

We spent much less than costs around here to rent out a playspace or other venue, which is typically a a few hundred dollars.  Here is my estimated breakdown for an afternoon's worth of happiness and memories:
  1. Water and Gatorade: $12
  2. 2 Large Pizzas (takeout): $10
  3. Paper goods: $20
  4. Silly string (always a hit!) Dollar Store: $14
  5. Sunglasses for all, for a bit of eye safety: $7
  6. Cake: Homemade, cost of ingredients only: $5
  7. Small nerf gun to take home (in lieu of gift bags): $35
Total outlay: $103.  Not bad for a party for 3 hours for 7 boys, and there are definitely ways to do this for even less.

You know what I think was the key? The party was about them, not us. It was what Carter wanted to do , and obviously he knows what his friends would enjoy. The house wasn't decorated with fancy decorations, invitations were either handwritten or emailed, and we just set up chairs on the lawn and invited parents to sit a while or go and enjoy some much deserved time to themselves, which most of them took advantage of. We simply supervised a larger-than-normal playdate, and made sure everyone was safe.  They ran and played like boys want to do, and we didn't step in or initiate an agenda of our own. It was simple, old-fashioned fun.   We stepped in to feed, make sure they drank, had gifts opened so thank-yous could be shared.  And yes, thank  you notes will be written; that is just a given. 

Total outcome for the day though? 

You got it. It was priceless.  


Friday, April 12

How I clean

I so wish I was a better housekeeper.  I love to organize, purge and re-arrange things, but the actual cleaning process is not my strongpoint.  I've tried  various systems, both online and of my own creation, schedules and such, and nothing sticks.  I just put it off, and clean as needed when I see it.  And in that schedule, the whole house is never clean at the same time. 

But today was one of those days where I really needed to clean and get the whole house ready at one time. 

Here is my method for that, and one that keeps me 1) on target, and 2) reduces distractions, and 3) builds in a bribery system.


We have a totally open floor plan on our first floor, which makes it really hard to keep focuses on one space and stay on task.  I start in one room, and everything that doesn't belong in that room goes into the next room, just over the threshold.  I don't allow myself to cross over into that room AT ALL (or else I spin my wheels and get nothing done).  Once everything is out of the room that doesn't belong, I put away everything in that room.  I don't "clean" anything, but leave that for last. 
As I go into the next room, I repeat the process.  Things that  belong in the garage go on the steps down.....


....and things that belong upstairs go on the steps up.


And yes, it gets really messy in the interim. 

I've found though, for me and the way my brain works, that if I took the dirty laundry upstairs, I'd start a load, get onto something else up there, and the downstairs would still be unfinished.  And if I took the tools down as I gathered them, I'd get distracted in an unfinished (and a lot more fun) project down there.  So I restrict my area mentally, and stick to it. 

And today, everyone got on the system.  You took a toy out, you need to put it back.

When I feel like I need a break, I set the timer for 10 minutes, and enjoy some cyber surfing.  When the timer goes off, I get back to work. 

Once everything is out of the first floor and on its way to it's rightful home, I clean.  Dust (yes, I really dusted today!), wipe counters, vacuum and clean floors. 

I'm amazed at how quickly I actually can get this accomplished when I stick to this plan, and it does feel great to have one big space clean at the same time!  Then I treated myself to a walk through our brand new HomeGoods store after some boring errands!

So at least one floor is presentable: bring on the ten year olds for a birthday celebration tomorrow! 


Wednesday, April 10

Scream!

Yes, this is the real deal.  "The Scream" by Edvard Munch, which is really one in a series of four "The Scream" paintings that he produced.   I did recognize the painting, but didn't know there were more than 4 in the series...thank you wikipedia!   Each of the four is called "The Scream", which is a little odd; wouldn't you think they would be called "Scream One", "Scream Two" etcetera?  I guess not.

We left the MoMA and walked across the street to one of our favorite places in New York, and saw this:


Yes! It's "Scream" in Legos!  I think we'll call it "Scream Five".  Now this is art we know something about!

So, which one do you prefer?

Hilarious job interview

So I do accounting as my "real" job and am in the process of building up a client base.  In a small town, every contact counts, so I responded to a position that a friend referred to me. 

Email sent: 10:27  You know, the whole "I am responded to your advertisement" kind of professional email, interested in the position you have open.

Phone rang: 10:29: Unknown number. Usually I don't answer these because our number is painfully close to the local cash advance type of place, and sadly it is usually someone who needs to bring in a payment.  But this time I picked up.   It was "the job". 

And I've never been asked for an interview quite like this: "Just brush your teeth and come on down".  Yes, really!  I responded (truthfully) that I had just walked the dog in the morning heat, and would need to do a little more than brush my teeth, but he said come on down whenever. 

So I did.  And I'm glad I did.  Not for the job, because it's not really a good fit for me right now.  But I met a really nice person, made a good contact, and shared some stories about our lovely town and our families. 

All in all, in was a fun morning.  I really love living in a small town.


Tuesday, April 9

Spring springing......

The saying is "spring has sprung", but spring is still waiting to spring from the trees.  I love this time of year when you get your first warm day, and you know the buds on the trees are just going to pop open overnight at any point.


 We had freezing temperatures a week ago and sleet on the ground while we were away.  Today is like two seasons ahead of that; we jumped from winter to summer in just 5 short days.

Last week we huddled to keep warm at a baseball game; tonight we will have to wear shorts and fan ourselves to keep cool.

I'm wearing flip-flops for the first time; shorts and white-white blinding legs.

The birds are chirping, and have been since 5am.  Right outside the bedroom window.  I laid awake waiting for the alarm go go off, wondering how I could get away with chopping the holly trees down beside that window without anyone noticing.

The weeds are rampant, and the perennials are trying to burst through in spite of them.

the view from my rocking chair, waiting for the bus
*Sigh*  I think I'll go get a pedicure.  Tomorrow I'll work.  It will all still be here.


**Updated: the weeds are still there, and no, I didn't get a pedicure.  I always think it would be a good idea, and never quite make it there.**

Monday, April 8

New york New York!

We love New York.  We took Carter two years ago for the first time, and he's asked to go back ever since.  We were able to take a few days and get up there over spring (ha!) break, and had a great time.   There was sleet and freezing weather at home, and we're glad we didn't have that, but it was Cold!!


mom.please.stop.taking.my.picture.


We did some things we've done before, and a few new things.  One of the funniest moments on the trip was in the Museum of Modern Art.
Something we recognize!

Yep, headed to an art museum in definitely new for us!  Carter was told by a teacher that there was a new exhibit there of old video games that you could play.  That was very interesting.  We headed into the other exhibits and were treated to very interesting, modern art.  A frying pan. A pile of yarn. A pink plank.  We know we just don't get the "art" in some of this, but we lost it when Carter came up to me and said "Mom....it's a piece of paper. In a frame." 

And it was.  It was a piece of white paper. Framed.  And then there was a piece of grayish-offwhite paper. Framed.  We laughed and laughed. 

OK, so we also did get to see art by Picasso, Cezanne and others that we recognized. That was fun.  But then he had enough and said "no more framed paper" and we gave in. 

Chinatown, Little Italy and his first Broadway show were our new things; the M&M store, the ferris wheel at ToysRUs and FAO Schartz were some favorites that we repeated.  There are still so many things on our list that we hope to experience next time. 

And now we're back home to reality and catching up with our sleep.  But we hope to be in the city that never sleeps very soon. 

Once we catch up.


Monday, April 1

Just this

My boy and his Ghee-ghee